A few weeks ago, I wrote about building a simple, home backup power system forcharging phones during extended electricity outages — like that which occurred during storm Sandy.
However, there’s a limitation to any battery system, and that is that any battery powersupply will eventually become depleted. I reckon to get a theoretical 13 days out ofmine. What happens, in a catastrophic event, if grid power isn’t restored at the end of13 days?
The answer is pretty simple. It’s simple to harness the sun’s rays and keep the batterytopped up with an electricity-producing photovoltaic solar panel.
Here’s how to go about it.
Step 1: Calculate Your Needs
Match the solar panel to the battery. Solar panel output is measured in watts. A rule ofthumb is to choose a panel with roughly the same number of watts as the battery has amphours.
Return to the battery article for a refresher on amp hours if you need it — but a 55-aHbattery like the Optima we used can comfortably pair with a 55-watt, or slightly higheroutput panel.
A flexible laminate amorphous panel like the one we’re using here pumps out 68-watts in full sun.
Step 2: Choose Your Panel
Portability and cost are the two major factors. All panels at the lowend of wattage output, like the one we’re working with, output at 12 Volts DC — correctlymatching the voltage of the battery.

Flexible panels are great for backup power because you can fold them or roll them upuntil you need them. They are also harder to break, unlike like the permanent-install glasstypes. The problem is that foldable panels are generally very expensive.
I have sourced a cheap rollup panel, manufactured by now-bankrupt Uni-Solar, that wasdesigned for sticking to metal roofs.
I recommend it for this solution. The U.S.-based company went bust partly as a result ofcheap imports and slowing economy — not because the product was no good. Obtain onefrom SoldonSun (about US$189 on Amazon and eBay).
Tip: Two 30-foot runs of solar-specific extension cable are useful if budget allows,so you can keep the battery in the protective shade (about $44 at Amazon).
Step 3: Gather the Rest of the Parts
Predominantly, you’ll need a charge controller.
Charge controllers stop the battery from becoming overcharged — and consequentlydamaged — by limiting the output of the panel. They can also perform neat battery trickslike interrupting power to the load in the event of low battery.
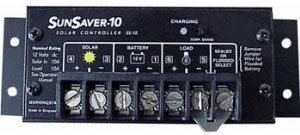
I’m using well-regarded Morningstar’s SunSaver 10 amp controller (about $48 onAmazon through SoldonSun).
Tip: The charge controller should exceed the output of the panel by at least 25 percent.
A rough, ballpark calculation for the controller is to divide watts-by-voltage to get the ampsdelivered by the panel. In this case, dividing 68 by 12 provides 5.66 amps.
Check with your manufacturer, though, because solar panels will provide more than12 volts under certain conditions, thereby increasing the amp load, resulting in beefiercharge controller needs.
Other parts you will need: 12-AWG automotive wire, called “primary wire”; a pair ofbattery terminals — the marine kind with wing nuts is best for this job; yellow color-coded wiring spades; large ring terminals and butt connectors; two pigtailed automotive-style fuse holders; two maximum 20-amp fuses; and associated tools like probevoltmeter, wire stripper and crimper.
You can source all of these materials from automotive stores like Autozone andelectronics stores like Frys.com.
Step 4: Hook It All Up
There is an order to all of this — fuses being last.
The Load
First, cut the alligator clamps off the end of the cigarette lighter plug we used on thebattery project and discard the clamps.
Then strip a quarter-inch from the ends of the retained wires and join a fuse-holderpigtail to the red, positive lead with a butt connector. I get aesthetically fancy here andalso heat-shrink the connection, but you don’t have to.
Add one spade to the other end of the positive fuse-holder pigtail and one spade to theend of the black lead from the cigarette lighter.
Attach the black lead to the controller’s negative screw labeled “Negative Load” orsimilar, and the red to the positive screw labeled “Positive Load.”
The cigarette lighter plug is now connected to the charge controller.
The Solar Panel
Cover the panel with its shipping paper, or roll it on itself to avoid arcing cables, and thenhook the solar panel to the “Solar” terminals on the charge controller.
Hard-to-work-with solar-specific MC3 plugs are commonly supplied in this environment.
However, you can just snip the MC3 ends off solar-specific cables at the chargecontroller end, and crimp spades to make the connections if you want. No fuse is requiredhere.
Tip: Check for polarity with your multimeter probes and multimeter set to DC beforeconnecting. Expose a little of the panel to generate some power, and check for a negativesymbol in the multimeter display that indicates incorrect polarity. Correct if necessary.
The Battery
Follow the wiring technique instructions in the earlier “Load” paragraph to make batteryconnections for the controller terminals labeled “Battery.”
Add a pigtail fuse holder on the positive wire within 6 inches of the battery. Crimp ringterminals and then connect the black and red wires under the corresponding battery wingnuts — positive first and then negative.
Step 5: Find a Sunny Spot
Place the solar panel in a maximum sun location, avoiding shade. Place the battery andcharge controller next to each other in the shade, observing any heat-reducing orientationrequirements from the charge controller’s instruction manual. I’ve mounted minevertically on the side of a battery box.
Then insert the fuses, inserting load circuit fuse first, then battery circuit. Observe the power-uplight sequence from the charge controller’s manual.
Plug your phone charger into the cigarette lighter socket along with phone, and watch thephone’s charging-in-progress indicator — forever.
Tip: Amorphous panels like the one mentioned will work in shade — it’ll just takelonger to charge the battery.
Want to Ask a Tech Question?
Is there a piece of tech you’d like to know how to operate properly? Is there a gadget that’s got you confounded? Please send your tech questions to me, and I’ll try to answer as many as possible in this column.
And use the Talkback feature below to add your comments!