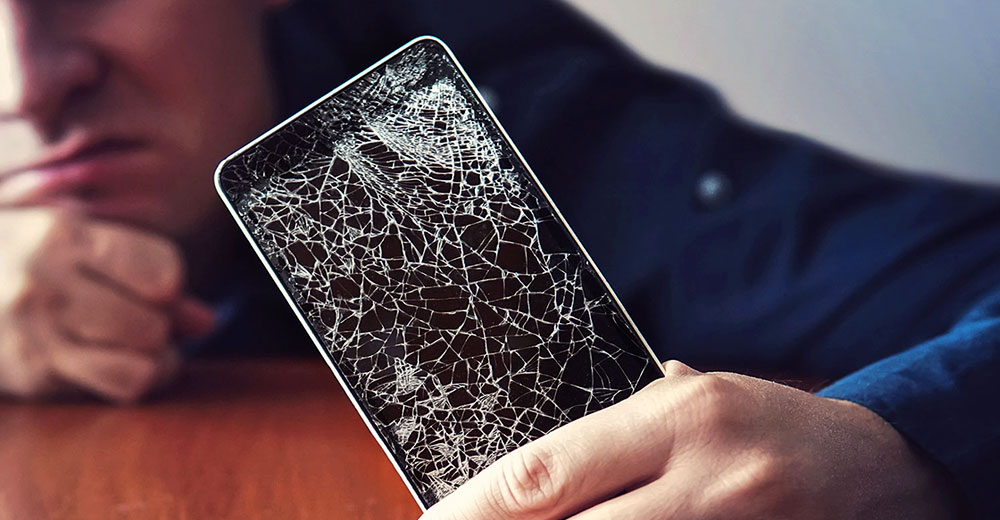
Cracked or broken mobile device screens can be costly to fix, but a few inexpensive do-it-yourself strategies can eliminate a repair shop visit and salvage your tablet or phone.
Third-party repair shops typically replace glass on a tablet for about US$100-$200, depending on the model. Replacing the tablet's touchscreen can cost $50-$75 extra.
Replacing the cracked glass with a functioning touchscreen is much cheaper. You can usually find suppliers online for $6 to $20 for a phone. A tablet replacement digitizer can cost about $50 or more if you perform the work.
It is relatively easy and cheap to replace the glass on a phone once you get the hang of it. Tablets are a bit more involved because of the larger size and added components.
Tools might require an additional monetary outlay if you do not have a well-functioning workbench. Depending on the device involved, you need a phone opener pry tool, little tweezers to deal with small cables inside, a Torx screwdriver, a flat-head screwdriver, and a precision screwdriver kit.
Add to that list either a variable hair dryer or a heat gun to soften glued phone parts. Also, add scissors, double-sided adhesive tape, canned air, and work gloves.
Assess Your Repair Needs
It is first things first when it comes to fixing cracks on a smartphone's screen. Often, the actual screen is not cracked at all. You may have installed a glass screen protector when you purchased the phone.
Carefully pry off the plastic bezel that covers the front of the device. Chances are the screen under it is perfectly intact.
That usually is not the case with tablets. So-called screen protectors on those devices are durable clear transparent film.
The film covers can become cloudy or scratched. They usually help absorb shock from items dropping on the tablet to lessen the risk of cracking the touchscreen glass under it.
It is relatively easy to peel off the old film cover and replace it with a new cover. Problem solved!
Fix vs. Replace
When the culprit really is a damaged screen, choosing one of the next three approaches can help you solve the problem. You might be able to repair the damage rather than replace it.
For instance, is the screen clouded or otherwise damaged from your mistaken use of harsh cleaning fluids or coarse paper towels to clean the screen? If so, there is a fix for that.
Is the screen merely cracked or full-out broken -- as in massive spider cracks from being smashed? You can cure a cracked screen on a phone or tablet more easily with Sugru, a commercial product. A fully cracked screen on either type of device is a solid candidate for a screen replacement.
Unsmearing the Smudges
If your phone or tablet screen shows signs of cleaning abuse or wear from heavy handling, return its condition to nearly new with an oleophobic coating kit. This is an oil-repellent coating that protects the screen, along with adding smoothness and reducing fingerprints.
The coating, a thin layer of fluoropolymer-based solids, is similar to Teflon and is bonded to the glass. You can buy the coating kit from a variety of electronic supply stores and online outlets.
You need these tools to apply the oleophobic coating: microfiber cleaning cloths, zipper plastic storage bags, 70 percent isopropyl alcohol.
Follow these steps:
- Thoroughly clean the surface with isopropyl alcohol. Then wipe the screen dry with a clean microfiber cloth.
- Prepare a wiping finger. The oleophobic coating's liquid solvent evaporates very quickly when applied, so once you start, work quickly. Wrap one finger with plastic wrap or a sandwich bag. Use this finger to rub the coating liquid onto the screen.
- Apply 10-15 drops of the coating to the screen's surface. If the phone or tablet screen has a large surface, apply 10 drops to a portion of the screen, working on one portion at a time.
- Lightly and swiftly distribute the coating by wiping your plastic-covered finger over the surface until the liquid evaporates.
- Wipe the screen dry with a clean microfiber cloth. Then give the coating time to dry. Do not touch the screen for 8-12 hours to allow the coating to bond to the surface.
- When the bonding time is completed, wipe off any residue remaining on the touch screen with a clean microfiber cloth.
- Repeat this process 2-3 times to fully maximize the oleophobic coating performance and film durability.
Two More Options
If your only complaint involves tiny scratches and cracks on a smartphone screen or a tablet glass, there are remedies that work with varying degrees of reliability. You can use a household eraser pad or an actual pencil eraser.
Magic eraser products clean up screen scratches in just a few seconds. Moisten a corner of the cleaning pad and apply gentle rubbing pressure.
Pencil erasers also work reasonably well in making scratches disappear. Simply rub the scratch left and right with the eraser for about 60 seconds. Then rub it up and down for 60 seconds.
Dental Care Alternative
Does using toothpaste to fill in the cracks really work? I put that fix in the category of more "mythful" thinking, but I know people who swear that this method is a cheap fix that works.
I consider toothpaste as a scratch remover a temporary fix. It works on small scratches and cracks.
It is not a permanent solution for a touchscreen that is constantly handled. At best, the paste-over process will make the cracks less obvious.
Sugru to the Rescue
Sugru is a moldable glue kit for repairing rather than replacing cracked screens. Actually, the product was not created with phone and tablet repairs in mind. Its intended purpose is more in the line of general repairs where bonding surfaces together and filling surfaces are needed.
I am sure similar pliable glues exist, but having stumbled on Sugru, I see it as a good starting point.
Depending on how badly the screen is damaged, it can be a good solution for cracks that spread from the phone or tablet screen's edges. However, for massive cracks that spread over the entire screen -- as spider cracks tend to do over time -- it will be a short-term fix at best.
Follow these steps:
- Wipe and clean your screen with a soft cleaning towel. Be careful not to pick up any loose glass in the process.
- Use transparent adhesive tape around the area to be patched. This works best when the phone is turned on.
- Mark over the tape to show the border around the patch area. This keeps the Sugru patch from getting where you do not want it.
- Apply small quantities of the patch to the cracked area of the screen. Be sure to apply the patch thinly. Gradually add more as needed.
Rip and Replace
If your phone or tablet screen has suffered more serious damage, full-scale surgery is the only option other than getting a new device. Repairing the device's LCD screen is a complicated procedure due to the compact internal design.
The repair process involves completely dismantling the phone or tablet's outer casing. It is particularly easy if the replacement screen comes with a top frame.
Otherwise, you may have to seal the layers to avoid loss of structural strength and moisture/dust protection. You can use either sealing pads for the size of the particular device at hand or double-sided sticky tape. A simpler solution for phone screen replacement is to use B-7000/T-7000 glue.
Before you roll up your sleeves to get started, take one huge safety step. Buy and use a static wristband and a static guard mat. This will ensure against accidentally frying any electronic components while disassembling and reassembling the devices. Disconnecting the battery is not always a guarantee that static discharge will not happen.
The first step is to tear down the device so you can assess the extent of the damage and determine what screen parts to order. Locate the model number for the LCD screen. Use this number in an Internet search to find a replacement screen.
The part or model number usually is printed on a label adhered to the sensor cable attached to the screen. You can access this cable after you separate the screen from the rest of the unit. Carefully disconnect the cable connector from the backside of the screen along the edge.
Doing the Teardown
Step 1: Remove the device's back cover and pull the main battery.
Step 2: Loosen any stuck-on cabling that is now exposed, like the camera cable. Then remove cables if the clasps are exposed. These cables simply slide out of any exposed sockets after clasps are released. The tape-style cables are often held onto the frame and parts by adhesive, so tug gently to release.
Step 3: Unscrew the Phillips or Torx screws that hold the motherboard-containing back frame to the LCD-containing chassis and place the screws in a bowl for safekeeping. Then separate the back frame from the chassis by gently and carefully pulling the two apart.
Step 4: Remove any further cable assemblies that have become exposed by the separation of parts. Maintain visual cues as to which cable to reattach where. For example, place them on the work surface face-up in the order of removal. Or take photos with a digital camera or smartphone.
Step 5: Remove the LCD-containing chassis from the front frame or bezel and glass assembly by unscrewing a second batch of screws. Store the second set of screws in a second bowl. Remove any further parts, such as the camera.
Step 6: Don't touch the LCD face. Separate the existing, damaged glass from the bezel or front frame by waving the heat gun over the adhesive and pulling it apart. Wear gloves here because the process involves further breaking the glass.
Tip: Be patient while the heat gun loosens the adhesive, and be careful not to break the bezel or front frame while removing the glass. You need the bezel intact.
Replacing the Screen
Step 1: Attach fresh two-sided tape to areas of the bezel that have lost their stickiness. Use the existing adhesive where possible. Do not allow the tape to overlap the visual part of the glass.
Step 2: Look for any foam padding or seals and reattach. Do not touch the inside of the glass. You won't be able to get rid of the fingerprints after assembly.
Step 3: Thread the digitizer cable and remount the new digitizer glass to the bezel by firmly pressing it into place. Then remove any dust from the LCD and glass with canned air.
Step 4: Reattach any parts, like the camera. Then reassemble the chassis, frame, and so on, in order.
Final Thoughts
You may have to assemble and disassemble a few times. The two sets of screws use similar holes. It is easy to insert the initial set of screws into the wrong holes. You will realize that only when the second set does not fit because you already used the hole.
Look for solid connections when attaching cables. Ensure that the clasps are open first. Usually, the up position is open.
In general, firm snaps indicate a good assembly. Always reapply any existing metallic tape. Count the screws. If you have any leftover, backtrack.
Replacing damaged touchscreens and digitizer panels is not rocket science, but the process does require careful attention to details. Following visual guides and screenshots can make the difference between initial success and having to make second or third efforts.
Visit iFixit for visual support. It offers many models of phones and tablets along with instructions on how to open the devices with the right tools.
Suggest a Topic
Is there a tech tutorial you'd like to see featured?
Email your ideas to me and I'll consider them for a future column.
And use the Reader Comments feature below to provide your input!


Thank you Jack M. Germain, for sharing informative article for people who just want to change the cell phone screen. One more thing you need to remember is the Screw position because small tiny screws are really hard to manage. Keep sharing informative articles.